The SSL Configuration Manager
Version 196X onward features a new and more straightforward method of configuring and managing SSL certificates and Certificate Requests.
There are three main sections to the SSL Configuration Manager.
The Certificate Listing Area
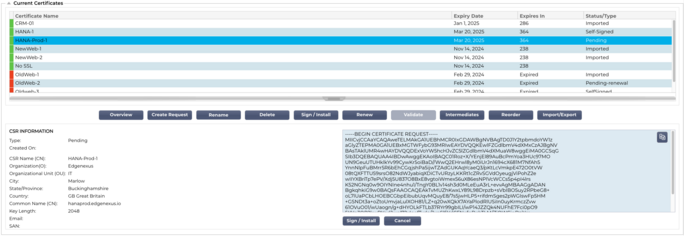
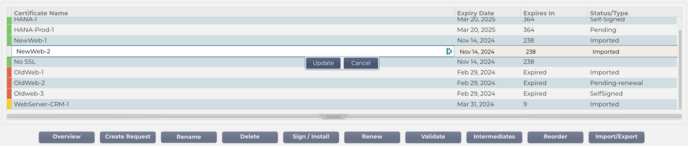
 The top side of the Manager shows the SSL certificates that are available for use or pending activation from a Trusted Authority.
 The certificates are displayed in a four-column display, showing the Certificate Name, Expiry Date, Expires In (number of days to expiry) and the Status/Type of the certificate.
Colour Codes
As you can see each line shows a certificate together with a colour coded block. Below is a table that shows the different colour coded blocks and their meaning.
|
Colour Code
|
Meaning
|
|
|
Certificate is current and has more than 60 days before expiry
|
|
|
Certificate will expire in less than 30 days
|
|
|
Certificate has between 30 and 60 days left
|
|
|
Certificate is about to expire with <1 day left
|
|
|
Certificate has expired
|
Certificate/CSR Information Display
Clicking on a certificate or a CSR displays its information in the bottom panel. See image below.
The Action Buttons & Configuration Areas
There are number of action buttons that are available and come into play when a certificate is selected in the Listing are.
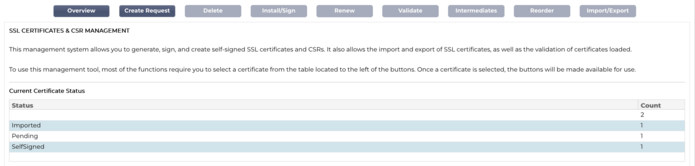
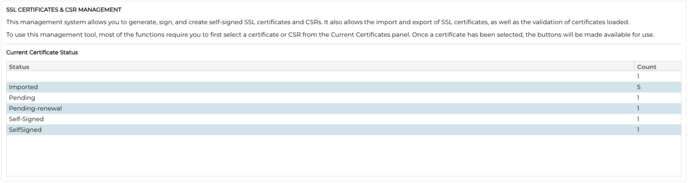
Overview
The Overview button displays an overall situation on certificates in the bottom section. Unlike other actions, the Overview button is independent and does not require a certificate to be selected.
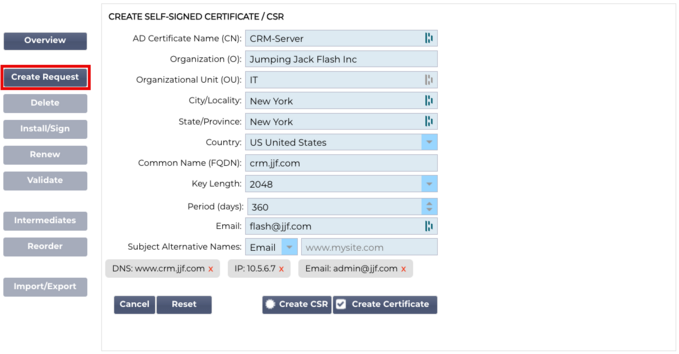
Create Request
If you want to create a self-signed certificate or a CSR, you need to click on the Create Request button. This will bring up a common entry panel that allows you to provide all the details that are required.
AD Certificate Name (CN)
This is a descriptive field that is used to display the name of the certificate in the ADC. The field entry should be specified as alphanumeric without spaces.
Organization (O)
This field is used to specify the name of the organization that is going to use the certificate.
Organizational Unit (OU)
Normally used to specify the department or organizational unit, this is an optional field.
City/Locality
As the name suggests, users generally tend to specify where the organization is located.
State/Province
Specify the state, county, or province in this field.
Country
This is a mandatory field and must be completed by selecting the country in which the certificate will be used. Please ensure that the information provided here is accurate.
Common Name (FQDN)
This is a critical field and is used to specify the fully qualified domain name (FQDN) of the server(s) that are to be protected using the certificate. This could be something like www.edgenexus.io, or edgenexus.io, or even a wildcard *.edgenexus.io. You could also use an IP address should you wish to bind the certificate to it.
Key Length
Used to specify the encryption key length for the SSL certificate.
Period (Days)
The length of certificate validity in days. Once the period has elapsed, the certificate will become non-operational.
Email
This is the administrative email ID used for the certificate.
Subject Alternate Names (SAN)
Subject Alternative Name (SAN) is an extension within SSL certificates that allows multiple domain names to be protected under a single certificate. This feature is especially useful for securing websites with multiple subdomains or different domain names, enabling a more streamlined and cost-effective approach to SSL management. By including SANs, a single SSL certificate can cover a variety of domain names and subdomains, eliminating the need for individual certificates for each web address, thereby simplifying the process of securing web communications and ensuring data encryption across diverse domains.
This field comprises of two elements, a drop-down allowing the selection of the type of SAN, and a text field to specify the value.
The EdgeADC has the following SANs available for use: DNS, IP Address, Email Address and URI. You can select and specify multiple SANs for a certificate or CSR.
SANs that have been specified can be removed by clicking the red x located in each SAN value.
DNS - The DNS Subject Alternate Name (SAN) allows you to specify additional domain names for which the certificate is valid. Unlike the Common Name (CN) field, which allows for only one domain, the SAN field can include multiple domain names, offering flexibility and scalability in certificate management. This is particularly useful for organizations hosting multiple services across different domains and subdomains, as it allows them to secure communications for all these entities under a single SSL/TLS certificate, simplifying administration and improving security.
IP Address - The IP Subject Alternative Name (SAN) allows the inclusion of IP addresses alongside domain names as entities protected by the certificate. This feature is crucial for securing direct access to services via IP addresses, ensuring that encrypted connections can also be established when accessing a server not through its domain name, but directly via its IP address. By incorporating IP SANs, organizations can enhance their network security by enabling SSL/TLS encryption for both domain-based and IP-based communications, making it versatile for environments where domain names may not be used or preferred for accessing internal resources or specific services.
Email Address - The Email Address Subject Alternative Name (SAN) permits you to specify additional email addresses to be associated with the certificate, beyond the primary domain or entity it was issued for. This allows the certificate to validate the identity of the issuer for multiple email addresses, not just a single domain or Common Name (CN). It's particularly useful in scenarios where secure email communication is required for various email addresses under the same organization or entity, ensuring that encrypted email exchanges are authenticated and tied back to the issuer's identity verified by the certificate. This makes the Email Address SAN a key feature for enhancing the security and trustworthiness of email communications within an encrypted framework.
URI - The URI (Uniform Resource Identifier) SAN is used to specify additional identities represented by URIs for a single entity secured by the certificate. Unlike traditional SAN entries that typically include domain names (DNS names) or IP addresses, a URI SAN enables the certificate to associate the entity with specific URIs, such as a URL to a specific resource or a service endpoint. This allows for more flexible and precise identification, enabling secure connections to be established with specific resources or services within a domain, rather than just securing the domain itself, thereby enhancing the granularity and scope of SSL/TLS certificates.
Once filled in correctly, you can choose to create a Certificate Signing Request (CSR) and send it for signing by a Certificate Authority or create a Self-Signed Certificate for immediate use.
The Cancel button will cancel the entire request, while the Reset button will reset all the fields.
Rename
The Rename button allows you to rename certificates that are not in use on Virtual Services.
To use this function:
Click on the certificate you wish to rename and click on the Rename button.
The certificate line will change and you will be able to change its name.
Once you are done, click the Update button.
You can also double click on the certificate to rename the certificate.
Delete
The Delete button will only be available when a certificate is selected. When clicked, it will display the following content.
The bottom pane will display the deletion request together with the name of the certificate to for which deletion has been requested.
Click the Delete button in the bottom right of the pane to proceed with the deletion.
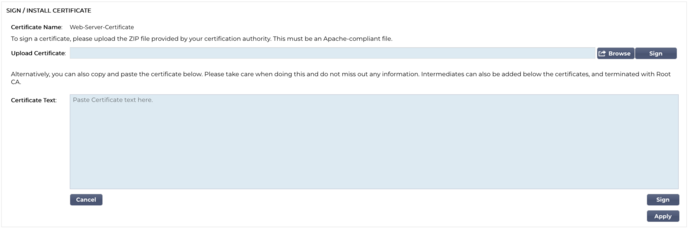
Install/Sign
When you create a CSR and wish to have the request signed by a Certificate Authority (CA), you will send the CSR to the CA. In return, the CA will send the signed certificate together with the Private Key file, and any intermediates required to make the certificate function properly.
They may well send you a ZIP file containing all the required elements, and this can be uploaded using the upper part of the right pane.
Alternatively, you can also construct the certificate set in a text editor and paste the content into the Certificate Text field in the lower section of the pane.
Once you have used either method, click the Sign button and then the Apply button. The signed certificate will now be displayed in the left pane.
Renew
When a certificate is due to expire past its validity data, the Renew button allows you to extend and renew the certificate. There are two types of renewal.
Self-Signed Certificates
Self-Signed certificates unlike trusted certificates cannot be renewed using a CSR. Instead, the self-signed certificate is renewed by presenting a new configuration using the existing data. The user is then allowed to specify a new name for the certificate together with a new expiry value for the certificate.
Once this is done, the new self-signed certificate will be created and saved in the certificate store. It is then the responsibility of the administrator to ensure that the virtual services that use the certificate are reconfigured in time.
Trusted Signed Certificates
When it comes to certificates that are trusted, and signed by a Certification Authority the use of CSRs is adopted.
When you click on an expiring certificate in the top panel, and click Renew, you will be presented with a new CSR using the current certificate details. The CSR can then be downloaded and presented to the certification authority for signing, after which the signed certificate can be installed.
The certificate that you had asked to renew will have a new status, Renewing. Once the signed certificate is installed the certificate you will be asked to allocate a new name to the certificate. This will then show as Trusted. The original certificate will be retained and any services using it should be configured to use the new certificate as soon as possible.
Validate Certificate
There are several parts that go together to make up an SSL certificate, and it is essential that these parts are not only present but are also in the correct order. The reasons for validating SSL certificates obtained from third party organizations are listed below.
Authentication: Validation ensures that the certificate comes from a trusted authority and verifies the identity of the website or server. This helps in preventing man-in-the-middle attacks, where an attacker could intercept the communication between a client and a server.
Integrity: By validating an SSL certificate, you can ensure that the certificate has not been tampered with or altered. This is crucial for maintaining the integrity of the secure connection.
Trust Chain Verification: SSL certificates are issued by Certificate Authorities (CAs). Validating a certificate includes verifying that it chains back to a trusted root CA. This process ensures that the certificate is legitimate and can be trusted.
Revocation Status: During validation, it's also important to check whether the SSL certificate has been revoked by the issuing CA. A certificate might be revoked if it was issued erroneously, the website's private key was compromised, or the site no longer needs the certificate. Importing a revoked certificate could lead to security vulnerabilities.
Expiration Check: SSL certificates are valid for a specific period. Validating a certificate on import includes checking its expiration date to ensure that it is still valid. Using an expired certificate could lead to vulnerabilities and might cause browsers or clients to reject the secure connection.
Configuration and Compatibility: Validation ensures that the certificate's configuration is compatible with the client's security policies and the technical requirements of the server or application. This includes checking the algorithms used, the certificate's purpose, and other technical details.
Compliance: In certain industries, regulations may require the validation of SSL certificates to ensure the secure handling of sensitive information. This is especially important in sectors like finance, healthcare, and e-commerce.
The ADC’s SSL management system allows the validation of an SSL certificate that has been imported.
Select an SSL certificate that you have imported.
Click the Validate button.
The results are seen in the lower panel as represented by the image below.
Adding Intermediates
As said earlier, SSL certificates comprise of several parts, one of which are the intermediate certificates that go to make up the complete chain.
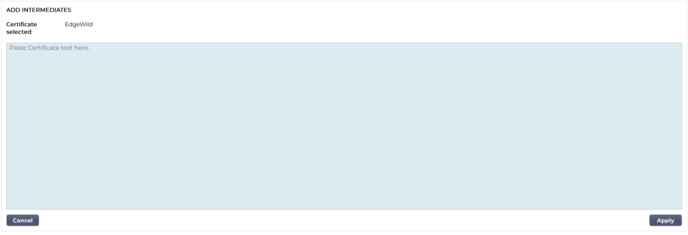
The SSL Manager in the ADC allows you to add any missing intermediate certificates.
Click on the SSL to which you wish to add the Intermediate certificate.
Click the Intermediates button.
A panel is shown, much like the image below.
Paste the content of the Intermediate certificate.
Click Apply.
It may be the case that you need to change the order of the Intermediate certificates, so the SSL certificate validates correctly. This is done using the Reorder button.
Reorder
For an SSL certificate to operate correctly, it must be in in the right order.
The golden rule is that the sender’s certificate must come first, with the final Root Certificate last in the chain. Generally, this looks somewhat like the below representation:
Original issuer > Intermediate 1 > Final Root.
The Final Root is a trusted root certificate provided by a certificate authority.
In some cases, there are several Intermediate certificates, and these should also be placed in the correct position. Essentially, each following certificate must certify the one preceding it. So, it could end up looking like this.
Original issuer > Intermediate 1 > Final Root
When you import say, Intermediate 2, this could be placed at the end of the chain, which would mean the certification failing validity. Hence, the need to reorder it and place Intermediate 2 into its correct position (shown in red).
So, the final one would look like this:
Original issuer > Intermediate 1 > Intermediate 2 > Final Root
-----BEGIN CERTIFICATE-----
MIIFKTCCBBGgAwIBAgISA/UUyBjJ71fucZuvpiLsdfsfsdfsdfd
...
hoFWWJt3/SeBKn+ci03RRvZsdfdsfsdfw=
-----END CERTIFICATE-----
-----BEGIN CERTIFICATE-----
MIIFFjCCAv6gAwIBAgIRAJErCErPDBinsdfsfsdfsdfdsfsdfsd
....
nLRbwHqsdqD7hHwg==
-----END CERTIFICATE-----
-----BEGIN CERTIFICATE-----
MIIFYDCCBsdfSDFSDFVSDVzfsdffvqdsfgsT664ScbvsfGDGSDV
...
Dfvp7OOGAN6dEOM4+SDFSDZET+DFGDFQSD45Bddfghqsqf6Bsff
-----END CERTIFICATE-----
-----BEGIN CERTIFICATE-----
MIIFYDCCBsdfSDFSDFVSDVzfsdffvqdsfgsT664ScbvsfGDGSDV
...
Dfvp7OOGAN6dEOM4+SDFSDZET+DFGDFQSD45Bddfghqsqf6Bsff
-----END CERTIFICATE-----
The Reorder section looks like the image below once you select a certificate and press the Reorder button.
To reorder the certificate sections, you can copy the text within the box, edit and reorder the content within a text editor and then paste it back to replace the existing content. Once done, click the Apply button.
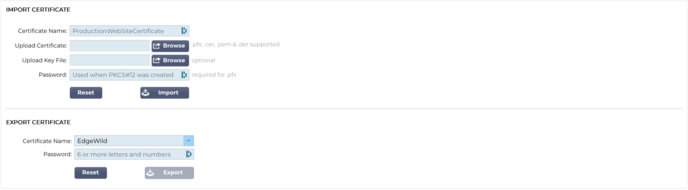
Import/Export
Whenever you receive a certificate from your SSL certificate provider, it will come as a ZIP file or a set of files. These will contain the SSL certificate, the key file and the root ca, as well as any intermediates.
You will need to import them into the ADC, and so, we have provided a method of importing them in.
There are a number of formats for SSL certificates such as CER, DER, PEM and PFX. Some formats require a KEY file to be added to the import procedure. PFX files require the password in order to import the PFX certificate.
We have also provided the means of export a certificate from the ADC if required. When exported, the file will be in PFX format, and it therefore requires a password for creating the export.