Installing on Citrix XenServer
The ADC Virtual appliance is installable on Citrix XenServer.
Extract the ADC OVA ALB-VA file to your local machine or server.
Open Citrix XenCenter Client.
In your XenCenter client, select "File: Import."
Browse to, and select the OVA file, then click "Open Next."
Select the VM creation location when asked.
Choose which XenServer you wish to install and click "NEXT."
Select the storage repository (SR) for virtual disk placement when asked.
Select an SR with enough space and click "NEXT."
Map your virtual network interfaces. Both interfaces will say Eth0; however, note that the bottom interface is Eth1.
Select the target network for each interface and click NEXT
DO NOT tick the "Use Operating System Fixup."
Click "NEXT"
Choose the network interface to use for the temporary transfer VM.
Choose the Management interface, usually Network 0, and leave the network settings on DHCP. Please be aware that you must assign static IP address details if you do not have a working DHCP server for the transfer. Failure to do this will result in the import saying Connecting continuously then failed. Click "NEXT"
Review all the information and check the correct settings then. Click "FINISH."
Your VM will begin transferring virtual disk "ADC" and, once complete, will show under your XenServer.
Within your XenCenter client, you will now be able to see the new virtual machine.
Right-click on the VA and click "START."
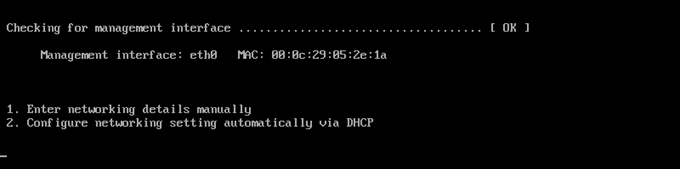
Your VM will then boot, and the ADC boot screen will show.
Once configured, the logon to the VA presents itself.
Please refer to the section First Boot Configuration to proceed further.